iOS中的图像处理(二)——卷积运算
关于图像处理中的卷积运算,这里有两份简明扼要的介绍:文一,文二。
其中,可能的一种卷积运算代码如下:
[cpp]
- (UIImage*)applyConvolution:(NSArray*)kernel
{
CGImageRef inImage = self.CGImage;
CFDataRef m_DataRef = CGDataProviderCopyData(CGImageGetDataProvider(inImage));
CFDataRef m_OutDataRef = CGDataProviderCopyData(CGImageGetDataProvider(inImage));
UInt8 * m_PixelBuf = (UInt8 *) CFDataGetBytePtr(m_DataRef);
UInt8 * m_OutPixelBuf = (UInt8 *) CFDataGetBytePtr(m_OutDataRef);
int h = CGImageGetHeight(inImage);
int w = CGImageGetWidth(inImage);
int kh = [kernel count] / 2;
int kw = [[kernel objectAtIndex:0] count] / 2;
int i = 0, j = 0, n = 0, m = 0;
for (i = 0; i < h; i++) {
for (j = 0; j < w; j++) {
int outIndex = (i*w*4) + (j*4);
double r = 0, g = 0, b = 0;
for (n = -kh; n <= kh; n++) {
for (m = -kw; m <= kw; m++) {
if (i + n >= 0 && i + n < h) {
if (j + m >= 0 && j + m < w) {
double f = [[[kernel objectAtIndex:(n + kh)] objectAtIndex:(m + kw)] doubleValue];
if (f == 0) {continue;}
int inIndex = ((i+n)*w*4) + ((j+m)*4);
r += m_PixelBuf[inIndex] * f;
g += m_PixelBuf[inIndex + 1] * f;
b += m_PixelBuf[inIndex + 2] * f;
}
}
}
}
m_OutPixelBuf[outIndex] = SAFECOLOR((int)r);
m_OutPixelBuf[outIndex + 1] = SAFECOLOR((int)g);
m_OutPixelBuf[outIndex + 2] = SAFECOLOR((int)b);
m_OutPixelBuf[outIndex + 3] = 255;
}
}
CGContextRef ctx = CGBitmapContextCreate(m_OutPixelBuf,
CGImageGetWidth(inImage),
CGImageGetHeight(inImage),
CGImageGetBitsPerComponent(inImage),
CGImageGetBytesPerRow(inImage),
CGImageGetColorSpace(inImage),
CGImageGetBitmapInfo(inImage)
);
CGImageRef imageRef = CGBitmapContextCreateImage(ctx);
CGContextRelease(ctx);
UIImage *finalImage = [UIImage imageWithCGImage:imageRef];
CGImageRelease(imageRef);
CFRelease(m_DataRef);
CFRelease(m_OutDataRef);
return finalImage;
}
方法的参数kernel是卷积运算中的卷积核,下面是几种滤镜的卷积核:
[cpp]
#pragma mark -
#pragma mark - Basic Convolutions
/* Reference :
* http://docs.gimp.org/en/plug-in-convmatrix.html
*/
- (UIImage *)sharpen
{
// double dKernel[5][5] = {
// {0, 0.0, -1.0, 0.0, 0},
// {0, -1.0, 5.0, -1.0, 0},
// {0, 0.0, -1.0, 0.0, 0}
// };
double dKernel[5][5] = {
{0, 0.0, -0.2, 0.0, 0},
{0, -0.2, 1.8, -0.2, 0},
{0, 0.0, -0.2, 0.0, 0}
};
NSMutableArray *kernel = [[[NSMutableArray alloc] initWithCapacity:5] autorelease];
for (int i = 0; i < 5; i++) {
NSMutableArray *row = [[[NSMutableArray alloc] initWithCapacity:5] autorelease];
for (int j = 0; j < 5; j++) {
[row addObject:[NSNumber numberWithDouble:dKernel[i][j]]];
}
[kernel addObject:row];
}
return [self applyConvolution:kernel];
}
- (UIImage *)edgeEnhance
{
double dKernel[5][5] = {
{0, 0.0, 0.0, 0.0, 0},
{0, -1.0, 1.0, 0.0, 0},
{0, 0.0, 0.0, 0.0, 0}
};
NSMutableArray *kernel = [[[NSMutableArray alloc] initWithCapacity:5] autorelease];
for (int i = 0; i < 5; i++) {
NSMutableArray *row = [[[NSMutableArray alloc] initWithCapacity:5] autorelease];
for (int j = 0; j < 5; j++) {
[row addObject:[NSNumber numberWithDouble:dKernel[i][j]]];
}
[kernel addObject:row];
}
return [self applyConvolution:kernel];
}
- (UIImage *)edgeDetect
{
double dKernel[5][5] = {
{0, 0.0, 1.0, 0.0, 0},
{0, 1.0, -4.0, 1.0, 0},
{0, 0.0, 1.0, 0.0, 0}
};
NSMutableArray *kernel = [[[NSMutableArray alloc] initWithCapacity:5] autorelease];
for (int i = 0; i < 5; i++) {
NSMutableArray *row = [[[NSMutableArray alloc] initWithCapacity:5] autorelease];
for (int j = 0; j < 5; j++) {
[row addObject:[NSNumber numberWithDouble:dKernel[i][j]]];
}
[kernel addObject:row];
}
return [self applyConvolution:kernel];
}
- (UIImage *)emboss
{
double dKernel[5][5] = {
{0, -2.0, -1.0, 0.0, 0},
{0, -1.0, 1.0, 1.0, 0},
{0, 0.0, 1.0, 2.0, 0}
};
NSMutableArray *kernel = [[[NSMutableArray alloc] initWithCapacity:5] autorelease];
for (int i = 0; i < 5; i++) {
NSMutableArray *row = [[[NSMutableArray alloc] initWithCapacity:5] autorelease];
for (int j = 0; j < 5; j++) {
[row addObject:[NSNumber numberWithDouble:dKernel[i][j]]];
}
[kernel addObject:row];
}
return [self applyConvolution:kernel];
}
在此基础上,我Google了下Photoshop中对照片进行黑白处理的简单步骤:
去色
调整对比度
高斯模糊
浮雕效果
边缘检测
调整对比度
调整亮度
反相
我按步骤实现了相应代码:
[cpp]
return [[[[[[[[originImage desaturate]
changeContrastByFactor:1.5]
gaussianBlur:1.3] emboss]
edgeDetect]
changeContrastByFactor:1.5]
changeBrightnessByFactor:1.5]
invert];
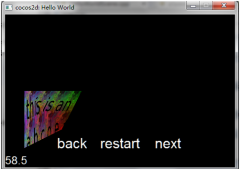
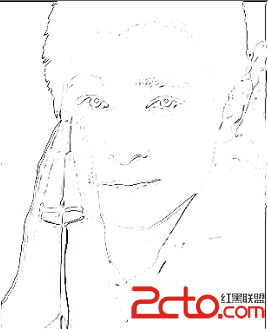
可惜效果有点粗糙,照片仍旧以上一篇文章中的Andy为例:
相关新闻>>
- 关于cocos2dx lua中的clone函数的源码解读
- cocos2d-x在iOS/Android双平台上嵌入WebView
- [cocos2dx 3.0 + ios]如何编写iAd的plugin
- cocos2d-x 3.0rc 较于2.2v 诸多变化中的一些小点
- iPhone开发中Cocoa中的CGRectMake具体用法
- [cocos2d-x IOS游戏开发]2014年开发及学习计划:cocos2d-x视频专
- cocos2d-x中的CCArray
- cocos iOS 编译
- Cocos2dx中的引用计数和自动回收池
- Cocos2dx 中的CCCallFunc,CCCallFuncN,CCCallFuncND,CCCallFuncO
![cocos2d_x+lua[2]](/uploads/allimg/131030/110J64609-0-lp.jpg)
- 发表评论
-
- 最新评论 进入详细评论页>>