Cocos2d-x3.0 RenderTexture(一) 保存
来源:未知 责任编辑:责任编辑 发表时间:2014-05-26 10:56 点击:次
.h
#include "cocos2d.h"
#include "cocos-ext.h"
#include "ui/CocosGUI.h"
#include "cocostudio/CocoStudio.h"
USING_NS_CC;

USING_NS_CC_EXT;
using namespace ui;
    RenderTexture* _target;
    Vector _brushs;

    void onTouchesMoved(const std::vector& touches, Event* event);

    void saveImage(cocos2d::Ref *sender);
    void clearImage(cocos2d::Ref *sender);
.cpp
        Size widgetSize = Director::getInstance()->getWinSize();


         layout = Layout::create();
        layout->setSize(Size(widgetSize.width, widgetSize.height));

        //横向排列,这里类似Android里的线性布局
        //layout->setLayoutType(LAYOUT_RELATIVE);
        /*以图片为背景*/
        layout->setBackGroundImageScale9Enabled(true);
        layout->setBackGroundImage("green_edit.png");

        layout->setPosition(Point(0,0));
        addChild(layout);


         alert = Text::create("Layout", "fonts/Marker Felt.ttf", 30 );
        alert->setColor(Color3B(159, 168, 176));
        alert->setPosition(Point(widgetSize.width / 2.0f,
                                 widgetSize.height / 2.0f - alert->getSize().height * 3.075f));

        layout->addChild(alert);


        _target = RenderTexture::create(widgetSize.width, widgetSize.height, Texture2D::PixelFormat::RGBA8888);
        _target->retain();
        _target->setPosition(Point(widgetSize.width / 2, widgetSize.height / 2));
        layout->addChild(_target);


        auto listener = EventListenerTouchAllAtOnce::create();
        listener->onTouchesMoved = CC_CALLBACK_2(LayoutTest::onTouchesMoved, this);
        _eventDispatcher->addEventListenerWithSceneGraphPriority(listener, this);

        //save Image menu
        MenuItemFont::setFontSize(40);
        auto item1 = MenuItemFont::create("save Image", CC_CALLBACK_1(LayoutTest::saveImage, this));
        auto item2 = MenuItemFont::create("Clear", CC_CALLBACK_1(LayoutTest::clearImage, this));
        auto menu = Menu::create(item1,item2, NULL);
        layout->addChild(menu);
        menu->alignItemsVertically();
        menu->setPosition(Point(VisibleRect::rightTop().x - 80, VisibleRect::rightTop().y - 80));
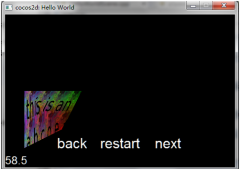
void LayoutTest::onTouchesMoved(const std::vector&touches, cocos2d::Event *event) { auto touch = touches[0]; auto start = touch->getLocation(); auto end = touch->getPreviousLocation(); //begin drawing to the render texture _target->begin(); //for extra points ,we'll draw this smoothly from the last position and vary the sprite's //scale/rotation/offset float distance = start.getDistance(end); if (distance > 1) { int d = (int)distance; _brushs.clear(); for (int i = 0; i < d; ++i) { Sprite* sprite = Sprite::create("image.png"); sprite->setColor(Color3B::RED); sprite->setOpacity(20); _brushs.pushBack(sprite); } for (int i = 0 ; i
相关新闻>>
最新推荐更多>>>
![cocos2d_x+lua[2]](/uploads/allimg/131030/110J64609-0-lp.jpg)
- 发表评论
-
- 最新评论 进入详细评论页>>