ios 网页中图片点击放大效果demo
来源:未知 责任编辑:责任编辑 发表时间:2014-05-26 10:58 点击:次
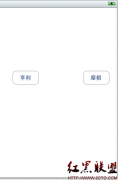
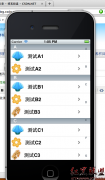
demo功能:点击网页中的图片,图片放大效果的demo。iphone6.1 测试通过。
demo说明:通过webview的委托事件shouldStartLoadWithRequest来实现。
demo截屏:


demo主要代码:
#pragma mark -
#pragma mark UIWebViewDelegate
- (BOOL)webView:(UIWebView *)webView shouldStartLoadWithRequest:(NSURLRequest *)request navigationType:(UIWebViewNavigationType)navigationType{
    //将url转换为string
    NSString *picName = [[request URL] absoluteString];
    NSLog(@"picName is %@",picName);
    //hasPrefix 判断创建的字符串内容是否以pic:字符开始
    if ([picName hasPrefix:@"pic:"]) {
        [self showBigImage:[picName substringFromIndex:4]];
        return NO;
    }else {
        return YES;
    }
}
#pragma mark -
//显示大图片
-(void)showBigImage:(NSString *)imageName{
    //创建灰色透明背景,使其背后内容不可操作
    UIView *bgView = [[UIView alloc] initWithFrame:CGRectMake(0, 0, 320, 460)];
    [bgView setBackgroundColor:[UIColor colorWithRed:0.3
                                               green:0.3
                                                blue:0.3
                                               alpha:0.7]];
    [self.view addSubview:bgView];
    [bgView release];

    //创建边框视图
    UIView *borderView = [[UIView alloc] initWithFrame:CGRectMake(0, 0, BIG_IMG_WIDTH+16, BIG_IMG_HEIGHT+16)];
    //将图层的边框设置为圆脚
    borderView.layer.cornerRadius = 8;
    borderView.layer.masksToBounds = YES;
    //给图层添加一个有色边框
    borderView.layer.borderWidth = 8;
    borderView.layer.borderColor = [[UIColor colorWithRed:0.9
                                                    green:0.9
                                                     blue:0.9
                                                    alpha:0.7] CGColor];
    [borderView setCenter:bgView.center];
    [bgView addSubview:borderView];
    [borderView release];

    //创建关闭按钮
    UIButton *closeBtn = [UIButton buttonWithType:UIButtonTypeCustom];
    [closeBtn setImage:[UIImage imageNamed:@"close.png"] forState:UIControlStateNormal];
    [closeBtn addTarget:self action:@selector(removeBigImage:) forControlEvents:UIControlEventTouchUpInside];
    NSLog(@"borderview is %@",borderView);
    [closeBtn setFrame:CGRectMake(borderView.frame.origin.x+borderView.frame.size.width-20, borderView.frame.origin.y-6, 26, 27)];
    [bgView addSubview:closeBtn];

    //创建显示图像视图
    UIImageView *imgView = [[UIImageView alloc] initWithFrame:CGRectMake(8, 8, BIG_IMG_WIDTH, BIG_IMG_HEIGHT)];
    [imgView setImage:[UIImage imageNamed:imageName]];
    [borderView addSubview:imgView];
    [imgView release];

}

#pragma mark -
#pragma mark UIWebViewDelegate
- (BOOL)webView:(UIWebView *)webView shouldStartLoadWithRequest:(NSURLRequest *)request navigationType:(UIWebViewNavigationType)navigationType{
    //将url转换为string
 NSString *picName = [[request URL] absoluteString];
 NSLog(@"picName is %@",picName);
    //hasPrefix 判断创建的字符串内容是否以pic:字符开始
 if ([picName hasPrefix:@"pic:"]) {
  [self showBigImage:[picName substringFromIndex:4]];
  return NO;
 }else {
  return YES;
 }
}
#pragma mark -
//显示大图片
-(void)showBigImage:(NSString *)imageName{
 //创建灰色透明背景,使其背后内容不可操作
 UIView *bgView = [[UIView alloc] initWithFrame:CGRectMake(0, 0, 320, 460)];
 [bgView setBackgroundColor:[UIColor colorWithRed:0.3
              green:0.3
            blue:0.3
              alpha:0.7]];
 [self.view addSubview:bgView];
 [bgView release];

 //创建边框视图
 UIView *borderView = [[UIView alloc] initWithFrame:CGRectMake(0, 0, BIG_IMG_WIDTH+16, BIG_IMG_HEIGHT+16)];
 //将图层的边框设置为圆脚
    borderView.layer.cornerRadius = 8;
 borderView.layer.masksToBounds = YES;
    //给图层添加一个有色边框
 borderView.layer.borderWidth = 8;
 borderView.layer.borderColor = [[UIColor colorWithRed:0.9
             green:0.9
              blue:0.9
             alpha:0.7] CGColor];
 [borderView setCenter:bgView.center];
 [bgView addSubview:borderView];
 [borderView release];

 //创建关闭按钮
 UIButton *closeBtn = [UIButton buttonWithType:UIButtonTypeCustom];
 [closeBtn setImage:[UIImage imageNamed:@"close.png"] forState:UIControlStateNormal];
 [closeBtn addTarget:self action:@selector(removeBigImage:) forControlEvents:UIControlEventTouchUpInside];
 NSLog(@"borderview is %@",borderView);
 [closeBtn setFrame:CGRectMake(borderView.frame.origin.x+borderView.frame.size.width-20, borderView.frame.origin.y-6, 26, 27)];
 [bgView addSubview:closeBtn];

 //创建显示图像视图
 UIImageView *imgView = [[UIImageView alloc] initWithFrame:CGRectMake(8, 8, BIG_IMG_WIDTH, BIG_IMG_HEIGHT)];
 [imgView setImage:[UIImage imageNamed:imageName]];
 [borderView addSubview:imgView];
 [imgView release];

}
相关新闻>>
- 发表评论
-
- 最新评论 进入详细评论页>>


![[iPhone中级]iPhone团购信息客户端的开发 (二)](/uploads/allimg/131022/200H11235-0-lp.png)