Nginx主主负载均衡架构

在和一些朋友交流Nginx+Keepalived技术时,我虽然已成功多次实Nginx+Keepaived项目方案,但这些都是用的单主Nginx在工作,从Nginx长期只是处于备份状态,所以我们想将二台Nginx负载均衡器都处于工作状态,其实用Nginx+Keepalived也很容易实现。此方法适用场景:适合中小型网站应用场景。
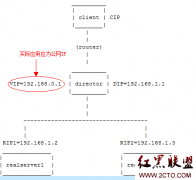
一般为了维护方便,企业网站的服务器都在自己的内部机房里,只开放了Keepalived的VIP地址的两个端口80、443,通过Juniper SSG550防火墙映射出去,外网DNS对应映射后的公网IP。此架构的防火墙及网络安全说明如下:
此系统架构仅映射内网VIP的80及443端口于外网的Juniper SSG550防火墙下,其他端口均关闭,内网所有机器均关闭iptables防火墙;外网DNS指向即通过Juniper SSG550映射出来的外网地址。
Nginx负载均衡作服务器遇到的故障一般有:1.服务器网线松动等网络故障;2.服务器硬件故障发生损坏现象而crash;3.Nginx服务进程死掉(这种情况理论上会遇到,但事实上生产环境下的Linux服务器没有出现过这种情况,足以证明了Nginx作为负载均衡器/反向代理服务器的稳定性,我们可以通过技术手段来解决这一问题)。
测试实验环境:
主Nginx之一:192.168.1.5
主Nginx之二:192.168.1.6
Web服务器一:192.168.1.17
Web服务器二:192.168.1.18
VIP地址一:192.168.1.8
VIP地址二:192.168.1.9
一、Nginx和Keepalived的安装比较简单,我这里就不重复了,我这里附上Nginx.conf配置文件,如下所示:
user www www;
worker_processes 8;
pid /usr/local/nginx/logs/nginx.pid;
worker_rlimit_nofile 51200;
events
{
use epoll;
worker_connections 51200;
}
http{
include mime.types;
default_type application/octet-stream;
server_names_hash_bucket_size 128;
client_header_buffer_size 32k;
large_client_header_buffers 4 32k;
client_max_body_size 8m;
sendfile on;
tcp_nopush on;
keepalive_timeout 60;
tcp_nodelay on;
fastcgi_connect_timeout 300;
fastcgi_send_timeout 300;
fastcgi_read_timeout 300;
fastcgi_buffer_size 64k;
fastcgi_buffers 4 64k;
fastcgi_busy_buffers_size 128k;
fastcgi_temp_file_write_size 128k;
gzip on;
gzip_min_length 1k;
gzip_buffers 4 16k;
gzip_http_version 1.0;
gzip_comp_level 2;
gzip_types text/plain application/x-javascript text/css application/xml;
gzip_vary on;
upstream backend
{
ip_hash;
server 192.168.1.17:80;
server 192.168.1.18:80;
}
server {
listen 80;
server_name www.1paituan.com;
location / {
root /var/www/html ;
index index.php index.htm index.html;
proxy_redirect off;
proxy_set_header Host $host;
proxy_set_header X-Real-IP $remote_addr;
proxy_set_header X-Forwarded-For $proxy_add_x_forwarded_for;
proxy_pass http://backend;
}
location /nginx {
access_log off;
auth_basic "NginxStatus";
#auth_basic_user_file /usr/local/nginx/htpasswd;
}
log_format access '$remote_addr - $remote_user [$time_local] "$request" '
'$status $body_bytes_sent "$http_referer" '
'"$http_user_agent" $http_x_forwarded_for';
access_log /data/logs/access.log access;
}
二、配置Keepalived文件,我这里简单说下原理,其实也就是通过Keepalived生成二个实例,二台Nginx互为备份,即第一台是第二台机器的备机,而第二台机器也是第一台的备机,而生成的二个VIP地址分别对应我们网站http://www.1paituan.com,这样大家在公网上可以通过DNS轮询来访问得到我们的网站,任何一台Nginx机器如果发生硬件损坏,Keepalived会自动将它的VIP地址切换到另一台机器,不影响客户端的访问,这个跟我们以前的LVS+Keepalived多实例的原理是一样的,相信大家也能明白。
主Nginx机器之一的Keepalived.conf配置文件如下:
! Configuration File for keepalived
global_defs {
notification_email {
yuhongchun027@163.com
}
notification_email_from keepalived@chtopnet.com
smtp_server 127.0.0.1
smtp_connect_timeout 30
router_id LVS_DEVEL
}
vrrp_instance VI_1 {
state MASTER
interface eth0
virtual_router_id 51
priority 100
advert_int 1
authentication {
auth_type PASS
auth_pass 1paituan.com
}
virtual_ipaddress {
192.168.1.8
}
}
vrrp_instance VI_2 {
state BACKUP
interface eth0
virtual_router_id 52
priority 99
advert_int 1
authentication {
auth_type PASS
auth_pass 1paituan.com
}
virtual_ipaddress {
192.168.1.9
}
}
主Nginx之二的keepalivd.conf配置文件如下:
! Configuration File for keepalived
global_defs {
notification_email {
yuhongchun027@163.com
}
notification_email_from keepalived@chtopnet.com
smtp_server 127.0.0.1
smtp_connect_timeout 30
router_id LVS_DEVEL
}
vrrp_instance VI_1 {
state BACKUP
interface eth0
virtual_router_id 51
priority 99
advert_int 1
authentication {
auth_type PASS
auth_pass 1paituan
}
virtual_ipaddress {
192.168.1.8
}
}
vrrp_instance VI_2 {
state MASTER
interface eth0
virtual_router_id 52
priority 100
advert_int 1
authentication {
auth_type PASS
auth_pass 1paituan
}
virtual_ipaddress {
192.168.1.9
}
}
我们分别在二台主Nginx上执行,命令如下所示:
nohup sh /root/nginxpid.sh &
此脚本我是直接从生产服务器上下载的,大家不要怀疑它会引起死循环和有效性的问题,我稍为解释一下,这是一个无限循环的脚本,放在主Nginx机器上(因为目前主要是由它提供服务),每隔5秒执行一次,用ps -C 命令来收集nginx的PID值到底是否为0,如果是0的话(即Nginx进程死掉了),尝试启动nginx进程;如果继续为0,即nginx启动失改, 则关闭本机的Keeplaived进程,VIP地址则会由备机接管,当然了,整个网站就会由备机的Nginx来提供服务了,这样保证Nginx进程的高可用。
四、正常启动二台主Nginx的Nginx和Keealived程序后,二台机器的正常IP显示应该如下所示:
这台是IP为192.168.1.5的机器的ip addr命令显示结果:
1: lo: <LOOPBACK,UP,LOWER_UP> mtu 16436 qdisc noqueue
link/loopback 00:00:00:00:00:00 brd 00:00:00:00:00:00
inet 127.0.0.1/8 scope host lo
2: eth0: <BROADCAST,MULTICAST,UP,LOWER_UP> mtu 1500 qdisc pfifo_fast qlen 1000
link/ether 00:0c:29:99:fb:32 brd ff:ff:ff:ff:ff:ff
inet 192.168.1.5/24 brd 192.168.1.255 scope global eth0
inet 192.168.1.8/32 scope global eth0
这台是IP为192.168.1.6的机器的ip addr命令显示结果:
1: lo: <LOOPBACK,UP,LOWER_UP> mtu 16436 qdisc noqueue
link/loopback 00:00:00:00:00:00 brd 00:00:00:00:00:00
inet 127.0.0.1/8 scope host lo
inet6 ::1/128 scope host
valid_lft forever preferred_lft forever
2: eth0: <BROADCAST,MULTICAST,UP,LOWER_UP> mtu 1500 qdisc pfifo_fast qlen 1000
link/ether 00:0c:29:7d:58:5e brd ff:ff:ff:ff:ff:ff
inet 192.168.1.6/24 brd 192.168.1.255 scope global eth0
inet 192.168.1.9/32 scope global eth0
inet6 fe80::20c:29ff:fe7d:585e/64 scope link
valid_lft forever preferred_lft forever
3: sit0: <NOARP> mtu 1480 qdisc noop
link/sit 0.0.0.0 brd 0.0.0.0
五、测试过程如下:
一、我们要分别在二台主Nginx上用killall杀掉Nginx进程,然后在客户端分别访问192.168.1.8和192.168.1.9这二个IP(模拟DNS轮询)看能否正常访问Web服务器。
二、尝试重启192.168.1.5的主Nginx负载均衡器,测试过程如上;
三、尝试重启192.168.1.6的主Nginx负载均衡器,测试过程如下;
四、尝试分别关闭192.168.1.5和192.168.1.6的机器,测试过程如上,看影响网站的正常访问不?
六、目前投入生产要解决的问题:
一、Cacti和Nagios等监控服务要重新部署,因为现在客户机是分别访问二台负载均衡器;
二、日志收集要重新部署,现在访问日志是分布在二台负载均衡器上;
三、要考虑google收录的问题;
四、证书的问题,二台机器都需要;
五、其它问题暂时没有想到,待补充。
作者 “抚琴煮酒”
相关新闻>>

- 发表评论
-
- 最新评论 进入详细评论页>>